
TL;DR
Placing your rig in a closet can drastically cut noise and reflections if you treat the space correctly. Focus on mic placement, sealing gaps, and using absorption in key spots. Ventilation is the key to avoiding overheating, making the ‘rig in the closet’ a practical, silent solution.
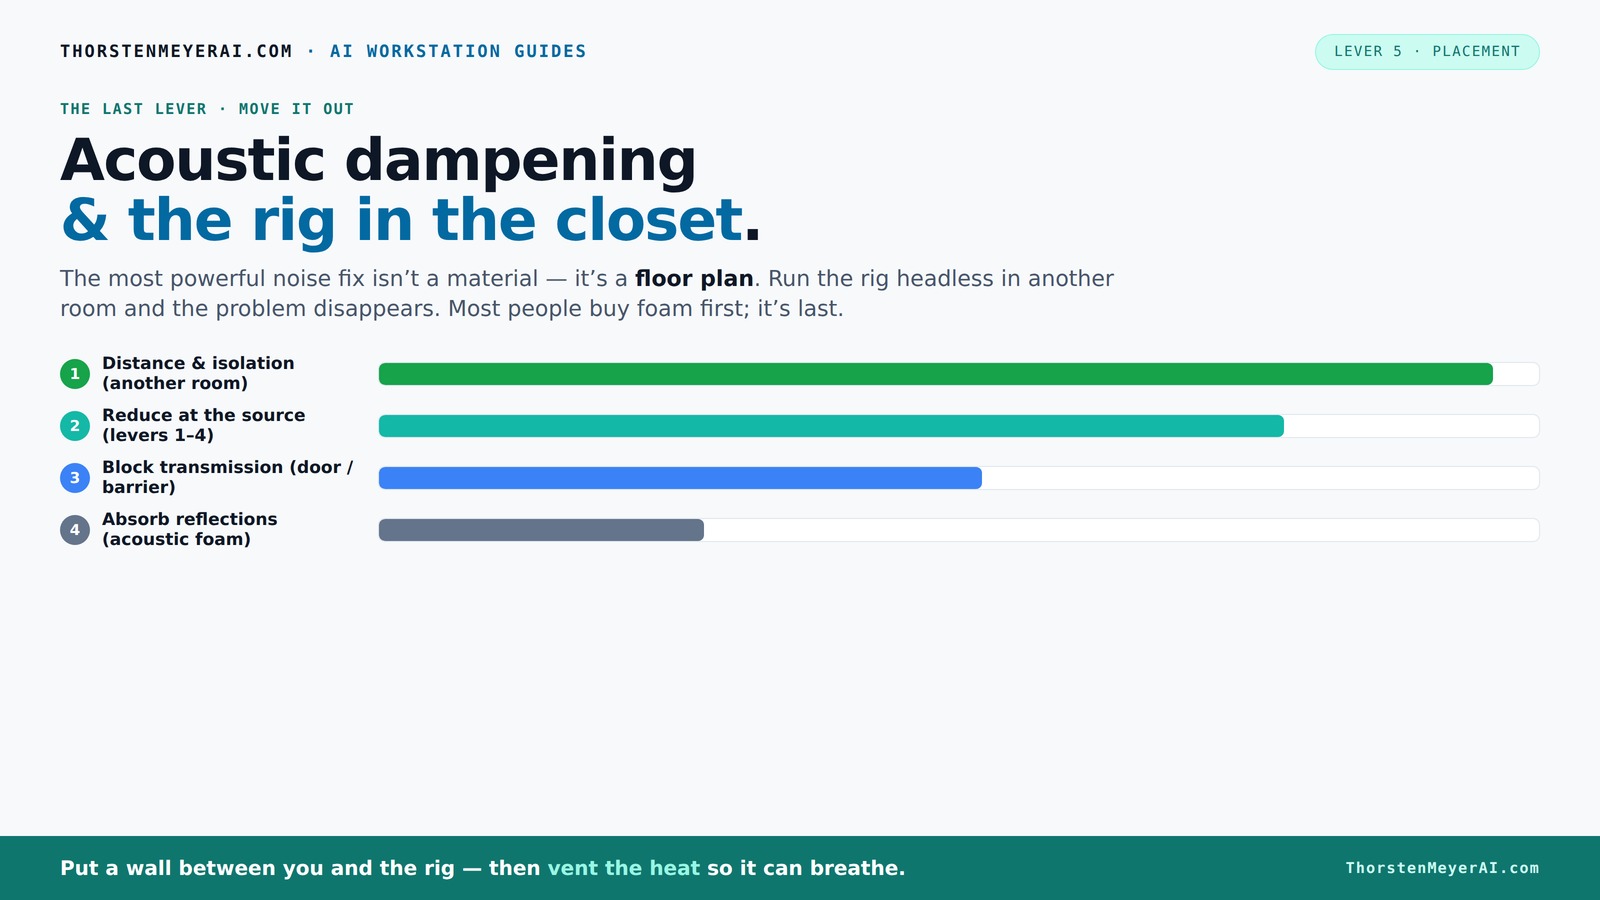
Acoustic dampening
& the rig in the closet.
The most powerful noise fix isn’t a material — it’s a floor plan. A rig you can’t hear because it’s in another room beats any amount of foam. Tap the approaches in Part 1 to see what actually works.
(another room)
(levers 1–4)
(door / barrier)
(acoustic foam)
Contain the noise, not the heat
Key Takeaways
- Sealing gaps and cracks around the door is the single most impactful step for reducing noise leakage.
- Placing the microphone close to your mouth and at an angle minimizes reflections and improves clarity.
- Ventilation is essential—use quiet fans or vents to prevent heat buildup that can force your rig to throttle and generate more noise.
- Treat reflection points with soft materials, but cover as much surface area as possible for the best sound absorption.
- Corners may need bass traps, but in small closets, general treatment and strategic placement often matter more.

24 Pack Black 12 x 12 x 2 Inches Pyramid Designed Acoustic Foam Panels, Sound Proof Foam Panels for Walls, High Density and Flame-Retardant Acoustic Panels, Sound Panels for Recording and Home Studio
Exceptional Sound Absorption:These pyramid acoustic panels are engineered to effectively absorb sound waves, reducing echo and reverberation. With...
As an affiliate, we earn on qualifying purchases.
As an affiliate, we earn on qualifying purchases.
Why Your Closet Can Be a Game-Changer for Sound
Small rooms like closets naturally contain sound. The tight space limits how far sound travels, so reflections bounce around less. Plus, the enclosed shape means less sound leaks outside if treated properly.
A closet’s volume—often less than 20 cubic feet—acts like a natural chamber, making it easier to control echoes and background noise. For example, a singer recording in a closet often hears less reverb and echoes compared to a large room. This makes the closet an ideal mini-studio—if you treat it right.
But don’t forget — small doesn’t mean no challenges. Without proper damping and sealing, sound can bounce and leak, ruining your recordings or spilling noise into the house. The key is to optimize placement and damping, turning a tiny space into your best friend for audio.

Aokeo Microphone Isolation Shield, Foldable Mic Shield with Triple Sound Insulation, Reflection Filter with 3/8" and 5/8" Mic Threaded Mount for Recording Studio, Podcasts, Singing, and Broadcasting
The Microphone Isolation Shield features a sound-proof foam front and a ventilated metal back panel to eliminate noise...
As an affiliate, we earn on qualifying purchases.
As an affiliate, we earn on qualifying purchases.
Best Mic Placement in a Closet: Capture Clear Voice & Minimize Reflections
The best mic placement in a closet is close, but not too close. Aim for about 6-12 inches from your mouth, pointing slightly downward or at an angle, to reduce reflections bouncing off the walls. For more tips, see our guide on mic placement.
For example, if you’re recording vocals, position the mic slightly off-center to avoid direct reflections from the wall behind you. Use a shock mount and a pop filter to keep the sound clean.
Remember: the closer the mic, the less room noise and reflections it picks up. But too close can cause proximity effect — a bass boost you might not want. Experiment with small adjustments to find what sounds best, then treat the surfaces nearest to your head to tame reflections further.
Understanding why this placement matters is crucial. When the mic is too far, it captures more room sound, reverb, and unwanted reflections, which muddy your recordings. Being too close can cause bass bumping and plosives. Finding the sweet spot ensures clarity, reduces post-processing, and creates a more professional sound. It’s a balance—closer for intimacy, but with strategic damping to prevent room reflections from ruining the quality.
Silverstone 21-Inch x 15-Inch 4mm Thick 2-Piece Sound Dampening Acoustic EP0M Silent Foam SF01 (Black)
Great quality EPOM foam material for noise absorption
As an affiliate, we earn on qualifying purchases.
As an affiliate, we earn on qualifying purchases.
What to Treat First: Gaps, Walls, Ceiling, or Floor?
Start with sealing gaps around the door and cracks because sound leaks most through these weak points. Use weatherstripping or acoustic sealant to block unwanted noise from escaping or entering.
Then, focus on treating the walls — especially those directly behind and beside your mic. Acoustic panels or blankets placed strategically can absorb early reflections.
The ceiling is often overlooked but can cause flutter echoes, especially if it’s reflective. Cover it with a soft material or foam panels. The floor? Use rugs or mats, especially if you’re on a hard surface, to reduce bouncing sound.
Understanding the order of treatment is vital because addressing the most significant leakage points first ensures efficient use of your resources. Sealing gaps prevents outside noise from entering and reduces sound leakage, which can otherwise compromise your recordings. Prioritizing reflective surfaces like walls and ceiling helps control internal echo and flutter, which are more challenging to fix after the fact. Flooring treatments are often last because they primarily affect sound bouncing up from below, but they still contribute to overall absorption. The goal is to create a balanced environment where sound is contained and controlled from the start.

Acoustic Pod, Portable Soundproof Office Pod Booth,Custom 2-5 Person Soundproof Booth, Rustproof Ergonomic Privacy Office Pod for Outdoor Backyard Office Team Collaboration Voice Recording Remote Jobs
Please Note: This Soundproof Office Pod has multiple models and supports customization. The prices listed are not final....
As an affiliate, we earn on qualifying purchases.
As an affiliate, we earn on qualifying purchases.
Foam vs. Blankets vs. Panels: What's the Best Choice?
Acoustic foam, blankets, and panels each serve different purposes. Foam is lightweight, easy to install, and good for reducing flutter echoes inside the space. Blankets are cheaper, versatile, and great for quick fixes. Learn more about sound treatment options.
Panels made from dense material absorb sound better than thin foam, especially for low frequencies. For example, a 2-inch thick panel can absorb frequencies down to around 200Hz, while foam might only be effective above 500Hz.
Using a combination often works best: hang blankets over the door, place foam panels on key reflection points, and consider bass traps in the corners if low-end buildup occurs.
In a small closet, covering as much surface as possible with soft, absorbent material—up to 100% wall coverage—yields the best results. The tradeoff with foam is cost versus coverage; while foam panels are effective, they can be expensive if you want full coverage. Blankets and DIY solutions offer budget-friendly alternatives that, when placed strategically, can approach the effectiveness of professional panels. The key is understanding the specific sound issues—flutter echoes, low-frequency build-up—and choosing the right materials accordingly. Covering the maximum surface area with soft materials helps tame the room’s acoustics holistically, rather than just patching individual spots.
Handling Corners & Bass Buildup: Keep Your Sound Tight
Corners are hotspots for low-frequency build-up, causing that booming sound in recordings. In a tiny closet, you can often get away with minimal bass trapping if you focus on treatment placement.
Simple bass traps, like thick acoustic panels or DIY rockwool in the corners, can cut down on muddiness. For example, a corner bass trap made from 4-inch thick mineral wool can reduce low-frequency resonance by around 60%.
If space is tight, placing thick panels diagonally in the corners can help tame bass issues without taking up much room. Remember, in a closet, even a few well-placed traps can make a big difference.
Addressing low-frequency issues is crucial because these frequencies tend to linger and cause muddiness, making your recordings sound boomy or muddy. Bass buildup is often the result of reflections and resonances that get trapped in the corners. Using bass traps or thick panels in these spots helps absorb these problematic frequencies, resulting in a clearer, more controlled sound. In small spaces, the tradeoff is between how much space you can allocate for trapping and how much you need to improve sound quality. Even minimal traps, if placed correctly, can significantly tighten your overall sound, reducing muddiness and improving clarity across the frequency spectrum.
Ventilation & Heat: Keep Your Rig Cool & Quiet
Placing your rig in a sealed closet traps heat. Without proper airflow, temperatures can soar, causing throttling and noisy fans. The key is to ventilate while keeping noise out.
Install passive vents or a quiet exhaust fan to pull hot air out. For example, a small 80mm fan running at low speed can cool a 600W GPU without adding much noise—often less than 20 dB.
If you want a truly silent setup, consider a purpose-built soundproof cabinet with ducted airflow. These units combine sound dampening with active cooling, allowing your rig to run cool and quiet for 24/7 operation.
Understanding the importance of cooling is critical because overheating can cause your hardware to throttle, reducing performance and increasing fan noise. Proper ventilation ensures your equipment stays within safe operating temperatures without noisy fans ramping up. Using ducted airflow or soundproofed enclosures balances cooling needs with noise reduction, which is especially important in small, enclosed spaces. Investing in quiet fans and strategic vent placement minimizes the impact on your recordings while keeping your gear operational and cool.
Putting It All Together: Make Your Closet a Silent, Cool Powerhouse
The most effective way to silence your closet rig is a mix of smart placement, sealing gaps, strategic damping, and ventilation. Start with sealing the door, then treat reflection points with panels or blankets.
Place your mic carefully, close to your mouth, and aim to minimize reflections from the wall behind you. Use bass traps if low-end sounds muddy or boomy. Ensure your rig has good airflow to prevent heat buildup.
For example, many creators successfully build a tiny closet booth with foam on the walls, weatherstripped door, and a small exhaust fan. The result? Quiet recordings, low background noise, and a rig that stays cool for hours.
Remember, the key is balancing soundproofing, acoustic treatment, and cooling. Neglecting any one aspect can compromise your results. When done correctly, even a small closet can become a professional-like space for recording and streaming, saving you money and space while delivering quality sound.